
Building a Woocommerce Membership Site Selling Virtual Downloadable Products
Introduction
This post is the result of hundreds of hours of experience and trial and error using Woocommerce across many different e-commerce websites selling both physical and virtual products. Specifically for the business owner and/or developer who wishes to build a subscription, membership capable e-commerce website that sells virtual products. I hope to provide a comprehensive roadmap for the process and technical aspects using WordPress and Woocommerce. This guide covers the functionality of the an e-commerce membership site. It does not cover how to install WordPress or how to build a front-end website design.
Table of Contents:
1. Initial Setup and Planning
1.a Assumptions
1.b Why Woocommerce?
1.c Woocommerce Extensions
1.d Costs Involved
2. Getting Started – Installing Woocommerce
2.a Installing Woocommerce Extensions
2.b Installing Woocommerce Extensions
2.c Woocommerce Pages
3. Virtual Content
3.a Hosting Virtual Content
3.b Delivering Virtual Content
4. Products
4.a Downloadable Products
4.b Restricted Products
4.c Membership Products
4.d How Do Customers Receive Membership Products?
5. Creating Groups Restricted Content Pages
1. Initial Setup and Planning
1.a Assumptions: This guide is meant to be comprehensive but it may not suit your specific needs or abilities. It is written with the following assumptions regarding your initial setup and technical abilities:*
- WordPress is installed on your website
- FTP Access to WP install
- Understanding of WordPress and a basic understanding of Woocommerce
- Ability to install and configure WordPress plugins (WordPress username with administrator access)
- Basic knowledge of html and css
- Selling virtual and/or downloadable products (As opposed to physical products)
- Permission to upload and sell the virtual products offered on your website
*Tip: If you have any questions about how to get started, consult an experienced web developer.
1.b Why Woocommerce? Woocommerce has a reputation as a great e-commerce platform for WordPress. I have used it for dozens of sites and it has held up well long term production setting. Assuming all plugins are updated regularly, it will provide you with a good long-term platform with minimal maintenance. We will use this powerful plugin as our starting point.
1.c Woocommerce Extensions: Plugin extensions will allow us to build an e-commerce website with the following capabilities:
- Sell individual virtual products such as e-books, audio, video or images
- Sell membership access to some or all content on your website
- Restrict content pages to members and/or single product customers
- Customer account creation and ‘My Account’ page for accessing files and updating personal information
- Subscription recurring billing
*Tip: Take advantage of Woocommerce support if you have any questions while you are setting up your site. In my experience they have been very helpful and responsive
1.d What are the costs involved? The Woocommerce platform is a free plugin. To accomplish our goal of building a membership site selling subscription memberships and individual product purchases, we will utilize the following plugin extensions*:
- Groups – Free
- Groups Woocommerce – $79.00
- Woocommerce Memberships – $149.00
- Woocommerce Subscriptions – $199.00
Total Plugin Investment: $427.00
*Tip: While these plugins are optimized to work together, they can be used independently of one another to suit your specific needs.
There are 3rd party websites that offer the same plugins for less, However I would recommend purchasing from Woocommerce directly. A year of updates and support are provided with a paid license.
2. Getting Started
2.a Installing Woocommerce: Our first step is to install Woocommerce. On a clean WordPress install*, upload and activate the Woocommerce plugin through the default WordPress plugin installation screen. If prompted to do a database update, do so now.
![]()
*Tip: While you can add these plugins to an existing site, for our purposes we will start with a new WordPress install to avoid conflict with other plugins.
2.b – Installing Woocommerce Extensions: After Woocommerce is installed and the necessary data upgrades are made, you can begin installing the extension plugins.
Download and Install Groups, Groups Woocommerce, Woocommerce Memberships, and Woocommerce Subscriptions. To download your plugin files, log into your Woocommerce account and click the ‘Download your Products’ link at the top of the My Account page.

Under the ‘Downloads’ tab, scroll down and download the Groups, Memberships and Subscriptions plugins. Upload the plugin .zip files to WordPress by going to Plugins -> Add New. Alternatively, you can upload the plugin folders via FTP.
The order in which you install the plugins does not necessarily matter, only that they are added after Woocommerce is installed. Don’t attempt to configure the plugins before all of the necessary plugin extensions have been installed. That way you are starting with a clean slate and any dependencies will be in place before we begin configuring the settings.
Install and activate the plugins one at a time. After you activate each plugin, refresh your browser window and look at the front end of your website to make sure the installation was successful. Don’t worry about testing the functionality for now. As with installing any plugin, We want to make sure that it doesn’t crash your website.
It is always good to follow best practices when installing any WordPress plugin. Always create a backup of your entire site and database before you make any changes. If a plugin causes your website to crash or you get the ‘white screen of death’, don’t panic. Log into the WordPress installation on your server via FTP. Navigate to wp-content -> plugins and delete the plugin folder that you just installed. Refresh the site several times and clear your browser cache. If that doesn’t do it, go back into FTP and delete the previous plugin and so on until the website comes back. As a last resort, you can restore your backup on a new WordPress install.
Once Woocommerce and all plugin extensions are installed, activate your licenses in the WordPress dashboard by selecting Woocommerce – > Extensions and selecting the ‘Woocommerce.com Subscriptions’ tab at the top. Here you will be able to connect your Woocommerce.com account and enable automatic updates. You might also see an alert at the top of the page, click ‘activate your product subscriptions’.
![]()
2.c Woocommerce Pages: It may be possible that upon installation that the pages required by Woocommerce are not present on your site. If you click ‘Checkout’ and are not redirected to the checkout page or you discover the cart page is missing, you need to install the required pages. In your WordPress dashboard, navigate to Woocommerce -> Status and select the ‘Tools’ tab at the top. Scroll down and click the ‘Install Pages’ button under ‘Install WooCommerce pages’.

3. Virtual Content
Now that we’ve set up Woocommerce and all of the necessary extensions, let’s look at the files you will be offering to your customers. Files can be offered as many different types including documents, audio, video, images or a zip file. However, for downloadable products we are limited to WordPress allowed file types only:
- Documents:
- pdf (Portable Document Format; Adobe Acrobat)
- .doc, .docx (Microsoft Word Document)
- .key (Apple Keynote Presentation)
- .ppt, .pptx, .pps, .ppsx (Microsoft PowerPoint Presentation)
- .odt (OpenDocument Text Document)
- .xls, .xlsx (Microsoft Excel Document)
- .zip
- Audio:
- .mp3
- .m4a
- .ogg
- .wav
- Video:
- .mp4, .m4v (MPEG-4)
- .mov (QuickTime)
- .wmv (Windows Media Video)
- .avi
- .mpg
- .ogv (Ogg)
- .3gp (3GPP)
- .3g2 (3GPP2)
If you are offering a file type that is not allowed by WordPress, try compressing and offering it as a zip file or embedded on a restricted content page.
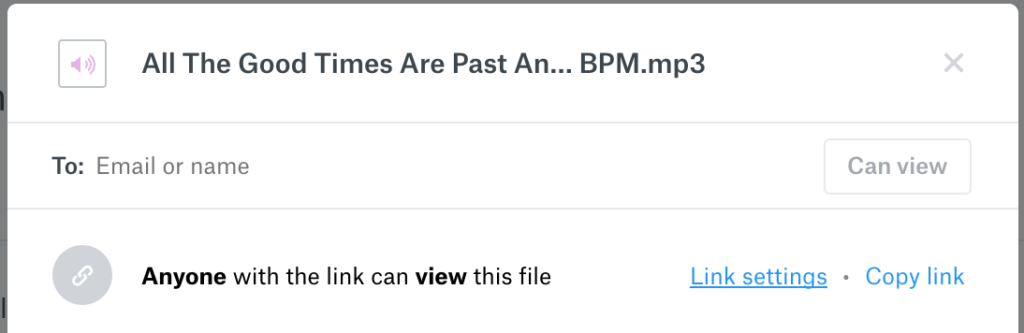
3.a – Hosting Virtual Content: Virtual content can vary greatly in file size depending on what type of product you are selling. For most files I always recommend hosting with a third party service like Dropbox or Vimeo. That way you can keep large files off of your server preventing any adverse performance issues.
Using Dropbox as an example, upload your file and click the ‘Share’ button. Select ‘Create a link’ to generate a shareable link for that file. This is the link you will use for your downloadable product or to embed into a content restricted page (See chapter 4).

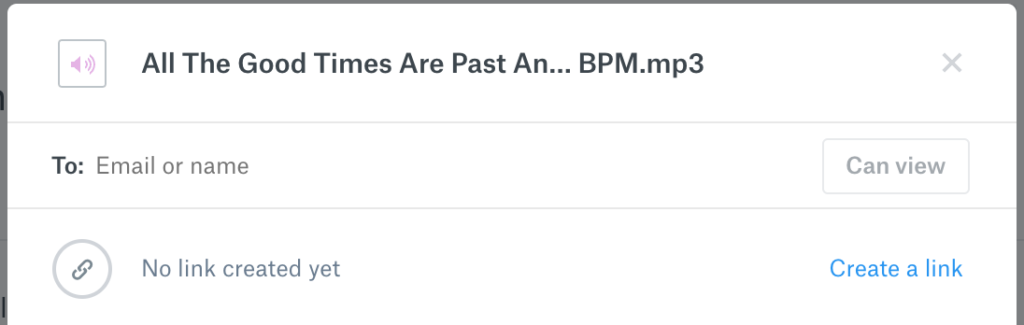
Make sure to set the file to be accessible to anyone who has the link on the share screen. This will ensure a user won’t be blocked from accessing the link once it is delivered.

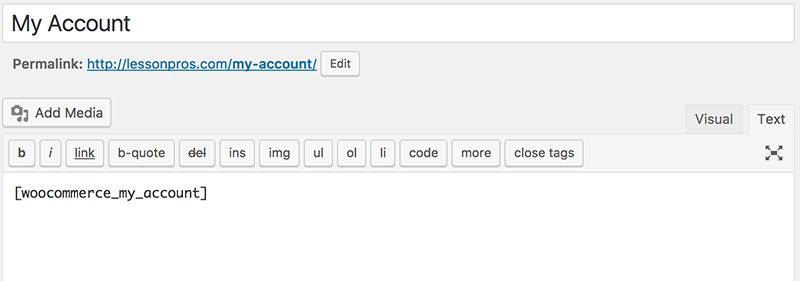
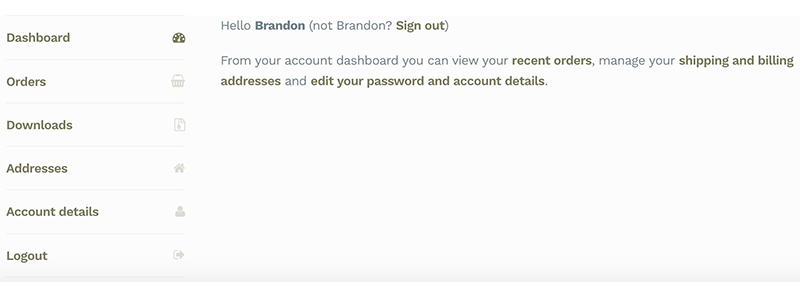
3.b – Delivering Virtual Content: After a customer makes a purchase, they are assigned a username and password allowing them to become a user on your site. When they log in they are given access to the ‘My Account’ dashboard included with Woocommerce. Here they will have access to all of the content they purchased as well as payment and account details.

Woocommerce should include a ‘My Account’ page when it is installed. You can also add the dashboard to any page by adding the my account shortcode.
4. Products
Once these plugins are installed, you can start setting up your virtual products. There are three types of virtual products: Downloadable, Restricted and Membership. These three product types are distinguished from one another in the way they are presented and delivered to your customers.
- Downloadable – Presented as static file download products. Delivered as file download links that are provided to a customer’s email address and on a username protected ‘My Account’ page.
- Restricted – Presented as access to a page containing embedded virtual content. A single purchase of a virtual product gives access to a restricted WordPress page. Page access is determined by granting groups access tied to the customer’s username.
- Membership – Customers are granted access to a membership plan. This plan determines what pages or products members have access to.
Products can be offered individually or combined. For example, You could have a product that offers download links and access to a restricted page simultaneously.
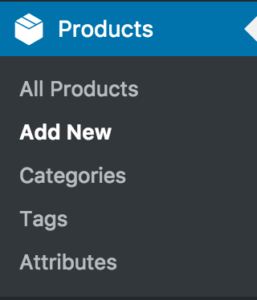
Create a new product by going to Products -> Add New.
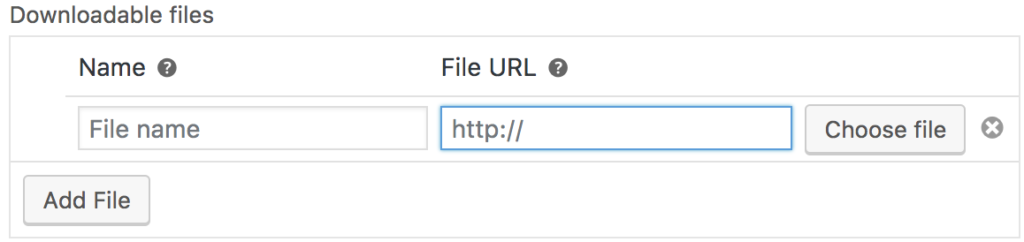
4.a Downloadable Products: After you create a new product, scroll down to the ‘Product Data’ box on the ‘Edit Product’ screen and set the product type to ‘Simple Product’. Make sure the ‘Virtual’ and ‘Downloadable’ boxes are checked.

Now we need to add the download file links that will be provided to your customer. Files are either uploaded directly to WordPress via the ‘Choose file’ button or added by pasting a third party link from a storage service such as Dropbox or Vimeo.
4.b Restricted Products: After you create a new product, on the ‘Edit Product’ screen scroll down to the ‘Product Data’ box and set the product type to ‘Simple Product’. Then check the ‘Virtual’ and ‘Downloadable’ boxes. This will give you fields where you can add your download links along with access to a restricted page.
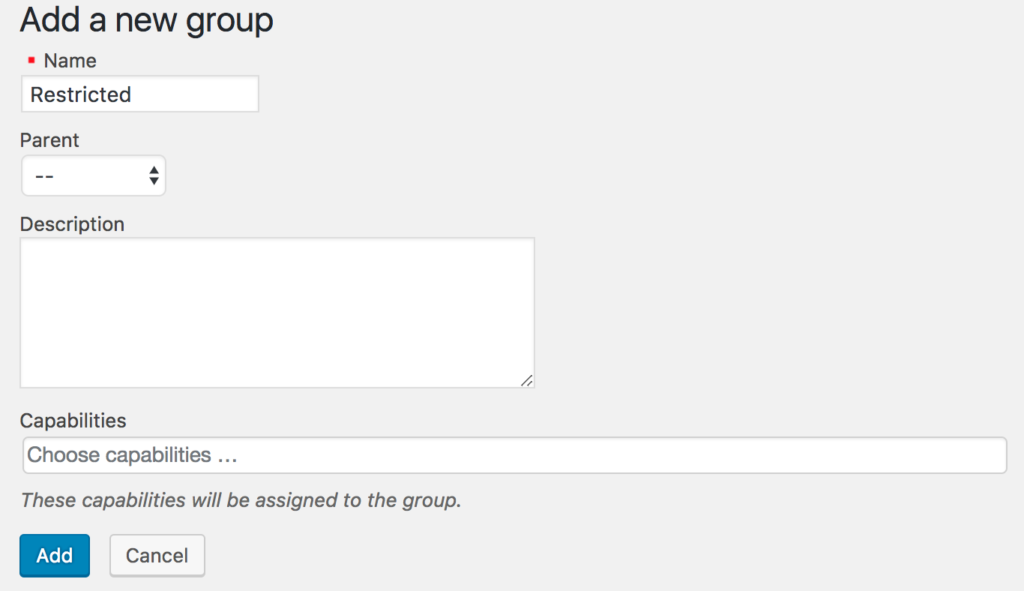
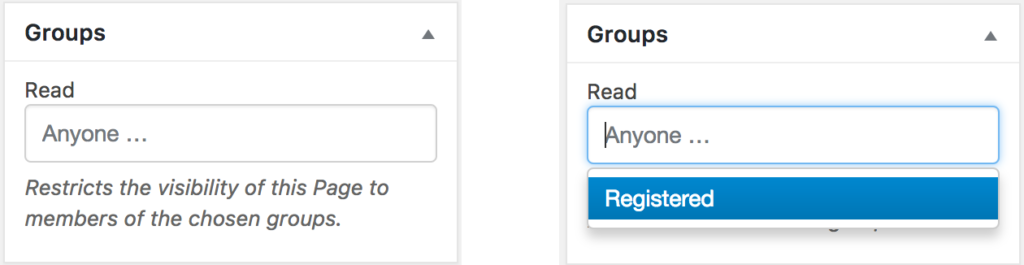
WordPress pages containing your virtual content are restricted based on a ‘group’ that the user is assigned to upon purchase. Let’s create a new group by going to Groups -> New Group. For now, we just need to give this new group a name. We’ll call it ‘Restricted’. Leave the capabilities option blank. Save the new group.
Next, we’ll create the restricted product. On the ‘Edit Product’ screen, scroll down to the ‘Product Data’ box and set the product type to ‘Simple Product’ and check the ‘Virtual’ box. You have the option to offer this product with download links by clicking the ‘Downloadable’ checkbox.
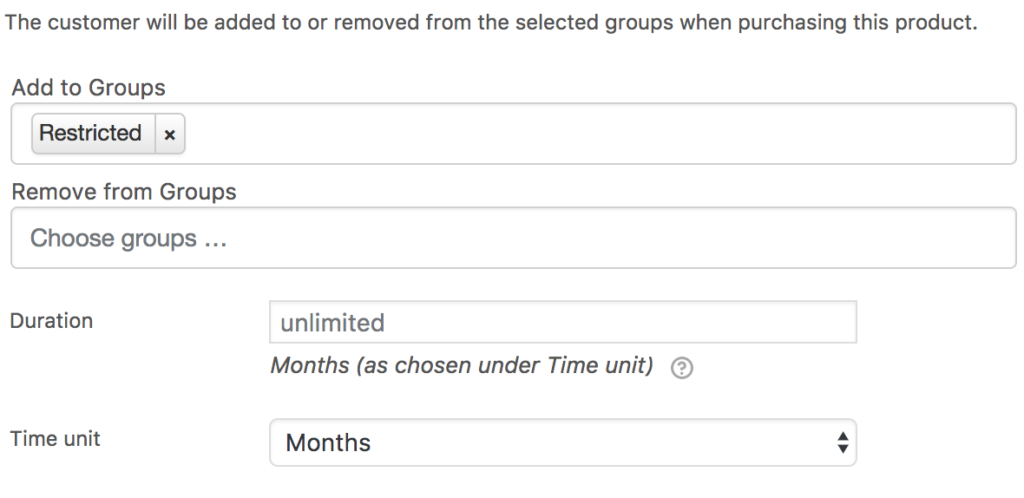
Next, we need to make use of the Groups plugin and assign a group to this product. In the product data box on the product edit screen, click the ‘Groups’ tab and select the ‘Registered’ group that we just created under the ‘Add to Groups’ field. You can also specify an amount of time that this group access will be valid. This functionality is useful for trial access to a specific page.
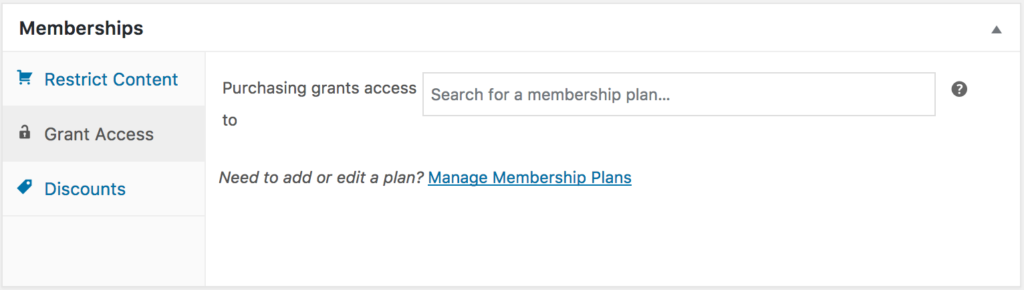
4c. Membership products: The purchase of a membership product will give your customers access to a specific membership plan. This plan will grant access to restricted content pages or products based on the customer’s username and password.
Make sure to set up a membership plan before setting up your product. In the WordPress dashboard, go to Woocommerce -> Memberships and create your new product’s membership plan. Set the ‘Grant access upon’ setting to ‘product(s) purchase’.
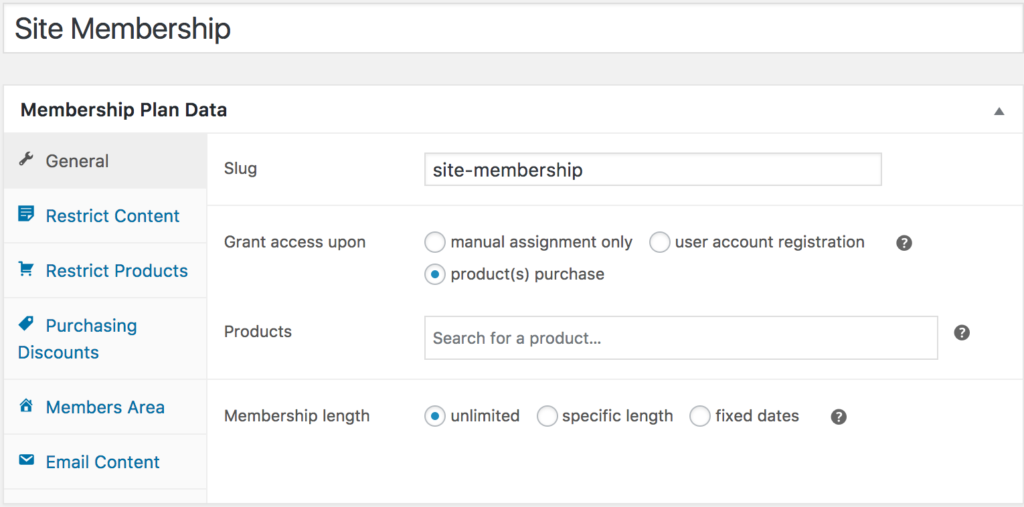
Next, click the ‘Restrict Content’ tab on the left side and specify the content page that this membership plan gives access to. Only members of this plan will have access to the pages specified.
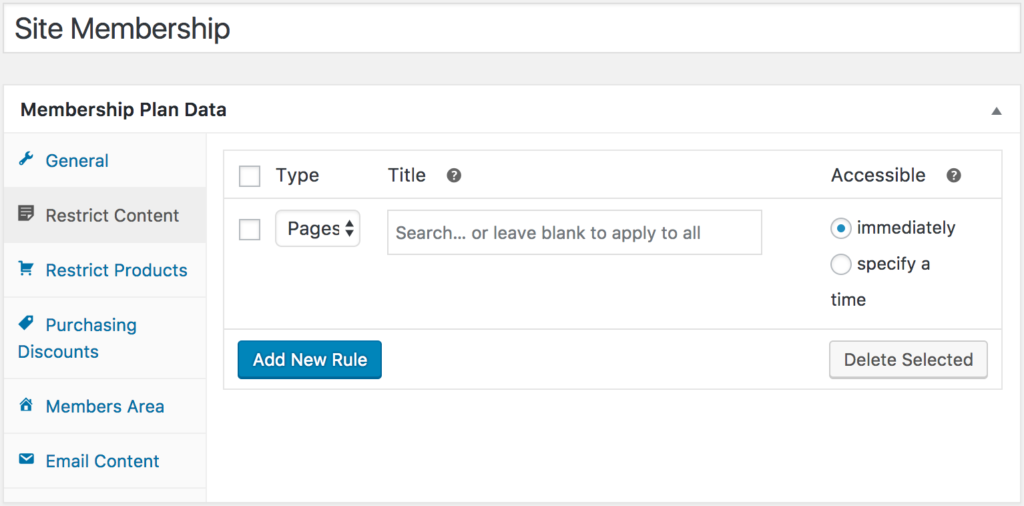
You can also set up access restrictions to specific products and customize what users see on their ‘My Account’ page to suit your specific needs.
Once your membership plan is set up, navigate back to your new membership product. Edit it and scroll down to the ‘Memberships’ box. Click the ‘Grant Access’ tab. Here you will specify the new membership plan you just created assigning the purchaser of the product to that plan. Once a membership product is purchased, they will then be allowed to access the page(s) assigned to the membership plan.
4.d How do customers receive virtual products? To deliver products to customers, you can use Woocommerce’s built in ‘My Account’ feature. An account is created when a user walks through the checkout process causing account credentials to be assigned. Once a customer purchases your virtual product or signs up for a membership which gives them group access to a product page, they will receive a link via email with a link to their ‘My Account’ Dashboard.
Downloadable file links will be offered under the ‘Downloads’ page link. You can also include them in the customer’s confirmation email by listing them in the product description box on the product edit screen.
5. Creating Groups Restricted Content Pages
5.a Downloadable Products
Content on this restricted page is where customers will be directed after purchase. Links to the page can also be provided via the customer confirmation email by adding them in the product description box on the product page edit screen.